
Implement a back office entry to list all content for a specific NodeType and a shadow container node
INFO
Since version 2.7: AbstractSingleNodeTypeController is available to simplify the creation of custom back office entries for specific NodeTypes.
This guide explains how to create a custom back office entry in Roadiz to list all node sources for a specific NodeType, using the NSArticle example as a reference. Ensure your NSArticle node-type entity exists in src/GeneratedEntity/NSArticle.php and is mapped to your Article NodeType.
Define a shadow container node
The shadowContainer is a concept used to organize and group nodes of a specific NodeType under a parent node in the content tree. This container is a real node in the database and acts as a logical root for listing, filtering, and managing related nodes in the back office, but this node is hidden from the node tree and cannot be accessed from the API. By overriding the getShadowRootNodeName() method in your controller, you define the name of this container, allowing Roadiz to display all nodes of your NodeType (e.g., articles) as if they belong to a dedicated section, and create new nodes inside it, improving navigation and clarity in the admin interface.
Create a DTO for your NodeType
DTOs (Data Transfer Objects) are useful for handling form data and validation. Create a DTO class for NSArticle (e.g., src/Model/CreateArticleInput.php):
<?php

declare(strict_types=1);

namespace App\Model;

use ApiPlatform\Metadata\ApiProperty;
use RZ\Roadiz\CoreBundle\Entity\Tag;
use Symfony\Component\Serializer\Attribute\Groups;
use Symfony\Component\Validator\Constraints\Length;
use Symfony\Component\Validator\Constraints\NotBlank;

final class CreateArticleInput
{
    /**
     * @param array<Tag>|null $tags
     */
    public function __construct(
        #[NotBlank]
        #[Length(max: 200)]
        #[Groups(['article'])]
        private ?string $title = null,
        #[Groups(['article'])]
        #[ApiProperty(example: [
            '/api/tags/1',
            '/api/tags/2',
            '/api/tags/3',
        ])]
        private ?array $tags = null,
    ) {
    }

    public function getTitle(): ?string
    {
        return $this->title;
    }

    public function getTags(): ?array
    {
        return $this->tags;
    }

    public function setTitle(string $title): CreateArticleInput
    {
        $this->title = $title;

        return $this;
    }

    public function setTags(?array $tags): CreateArticleInput
    {
        $this->tags = $tags;

        return $this;
    }
}
Create a FormType for your DTO
Create a Symfony form type for your NodeType entity (e.g., src/Form/CreateArticleType.php):
<?php

declare(strict_types=1);

namespace App\Form;

use App\Model\CreateArticleInput;
use RZ\Roadiz\CoreBundle\Form\DataTransformer\TagArrayTransformer;
use RZ\Roadiz\CoreBundle\Form\TagsType;
use Symfony\Component\Form\AbstractType;
use Symfony\Component\Form\Extension\Core\Type\TextType;
use Symfony\Component\Form\FormBuilderInterface;
use Symfony\Component\OptionsResolver\OptionsResolver;
use Symfony\Component\Validator\Constraints\NotBlank;
use Symfony\Component\Validator\Constraints\NotNull;

final class CreateArticleType extends AbstractType
{
    public function __construct(
        private readonly TagArrayTransformer $tagArrayTransformer,
    ) {
    }

    public function buildForm(FormBuilderInterface $builder, array $options)
    {
        $builder
            ->add('title', TextType::class, [
                'label' => 'title',
                'constraints' => [
                    new NotNull(),
                    new NotBlank(),
                ],
            ])
            ->add('tags', TagsType::class, [
                'label' => 'tags',
                'required' => false,
            ])
        ;

        $builder->get('tags')->addModelTransformer($this->tagArrayTransformer);
    }

    #[\Override]
    public function configureOptions(OptionsResolver $resolver): void
    {
        $resolver->setDefault('data_class', CreateArticleInput::class);
    }
}
Create a custom admin Controller
Now you can create a custom controller by extending AbstractSingleNodeTypeController. This base controller provides the necessary methods to handle listing, adding, and populating node sources for your NodeType. Place your controller in the App\Controller\Admin namespace to clarify that it is for back office use. For example, in src/Controller/Admin/ArticleController.php.
INFO
AbstractSingleNodeTypeController declares 2 generic types: <TEntity, TInputDto>, this will help your IDE to understand which entity and DTO you are using in your controller.
<?php

declare(strict_types=1);

namespace App\Controller\Admin;

use RZ\Roadiz\RozierBundle\Controller\AbstractSingleNodeTypeController;
use App\GeneratedEntity\NSArticle;
use App\Form\CreateArticleType;
use App\Model\CreateArticleInput;

/**
 * @extends AbstractSingleNodeTypeController<NSArticle, CreateArticleInput>
 */
final class ArticleController extends AbstractSingleNodeTypeController
{
    #[\Override]
    protected function getRequiredRole(): string
    {
        return 'ROLE_ACCESS_NODES';
    }

    #[\Override]
    protected function getNodeTypeName(): string
    {
        return 'Article';
    }

    #[\Override]
    protected function getEntityClass(): string
    {
        return NSArticle::class;
    }

    #[\Override]
    protected function getFormType(): string
    {
        return CreateArticleType::class;
    }

    #[\Override]
    protected function createInputDto(): object
    {
        return new CreateArticleInput();
    }

    #[\Override]
    protected function getDefaultRouteName(): string
    {
        return 'admin_article_list'; // Must match your route name for the list page
    }

    #[\Override]
    protected function getBulkPublishRouteName(): ?string
    {
        return 'appArticlesBulkPublishPage';
    }

    #[\Override]
    protected function getBulkUnpublishRouteName(): ?string
    {
        return 'appArticlesBulkUnpublishPage';
    }

    #[\Override]
    protected function getBulkDeleteRouteName(): ?string
    {
        return 'appArticlesBulkDeletePage';
    }

    #[\Override]
    protected function getShadowRootNodeName(): string
    {
        return 'articles'; // Must match you existing shadow container node name
    }

    #[\Override]
    protected function populateItem(object $input, Request $request): NodesSources
    {
        $item = parent::populateItem($input, $request);

        // Implement any custom logic to populate your NodeSource entity from the input DTO
        $item->setTitle($input->getTitle());
        $item->setPublishedAt(null);
        $item->getNode()->setTags($input->getTags() ?? []);

        return $item;
    }
}
Register the Controller Route
Add a route in your configuration (e.g., config/routes.yaml):
admin_article_list:
    path: /rz-admin/articles
    defaults:
        _controller: App\Controller\Admin\ArticleController::defaultAction

admin_article_add:
    path: /rz-admin/articles
    defaults:
        _controller: App\Controller\Admin\ArticleController::addAction
Create Twig Templates
Create Twig templates in templates/admin/article/ to support your back office entry:
list.html.twig: Lists all nodes-sources for your NodeType.add.html.twig: Displays a form to add a new node-source.row.html.twig: Displays a single item row (only its<td>).row_header.html.twig: Displays listing table header (only its<th>).
Example structure:
templates/
└── admin/
    └── article/
        ├── add.html.twig
        ├── bulk_base.html.twig
        ├── bulk_delete.html.twig
        ├── bulk_publish.html.twig
        ├── bulk_unpublish.html.twig
        ├── list.html.twig
        ├── row.html.twig
        └── row_header.html.twig
You can start by copying and customizing templates from the Rozier bundle, adapting them to your fields and UI needs. Use Twig to loop through your node-sources and render forms using Symfony's form helpers.
INFO
There is no edit.html.twig template required, as AbstractSingleNodeTypeController redirects users to the classic Roadiz edit nodes-sources page for editing actions.
Add a Backoffice Entry in roadiz_rozier.yaml
To make your custom back office entry visible in the Roadiz admin menu, add an entry to the entries section of your config/packages/roadiz_rozier.yaml file. For example, to add an entry for your articles list:
roadiz_rozier:
    # ...existing config...
    entries:
        # ...existing entries...
        articles:
            name: articles
            route: admin_article_list  # This should match your route name in routes.yaml
            icon: uk-icon-paper-plane  # Choose an icon from UIkit or Roadiz icon set
roles: [ 'ROLE_BACKEND_USER' ] # Optional: restrict access to specific rolesname: The label shown in the menu.route: The Symfony route name for your controller action (e.g.,admin_article_list).icon: The icon for your entry (UIkit or Roadiz icon class).roles: (Optional) Array of roles required to see this entry.
TIP
You can add subentries for more granular navigation, following the structure used for nodes in the example above.
This completes the process for adding a custom back office entry, including making it visible in the Roadiz admin menu via roadiz_rozier.yaml.
TIP
You can repeat this process for any NodeType by creating a corresponding entity, form type, DTO, and controller in the Admin namespace, then registering the route and templates.
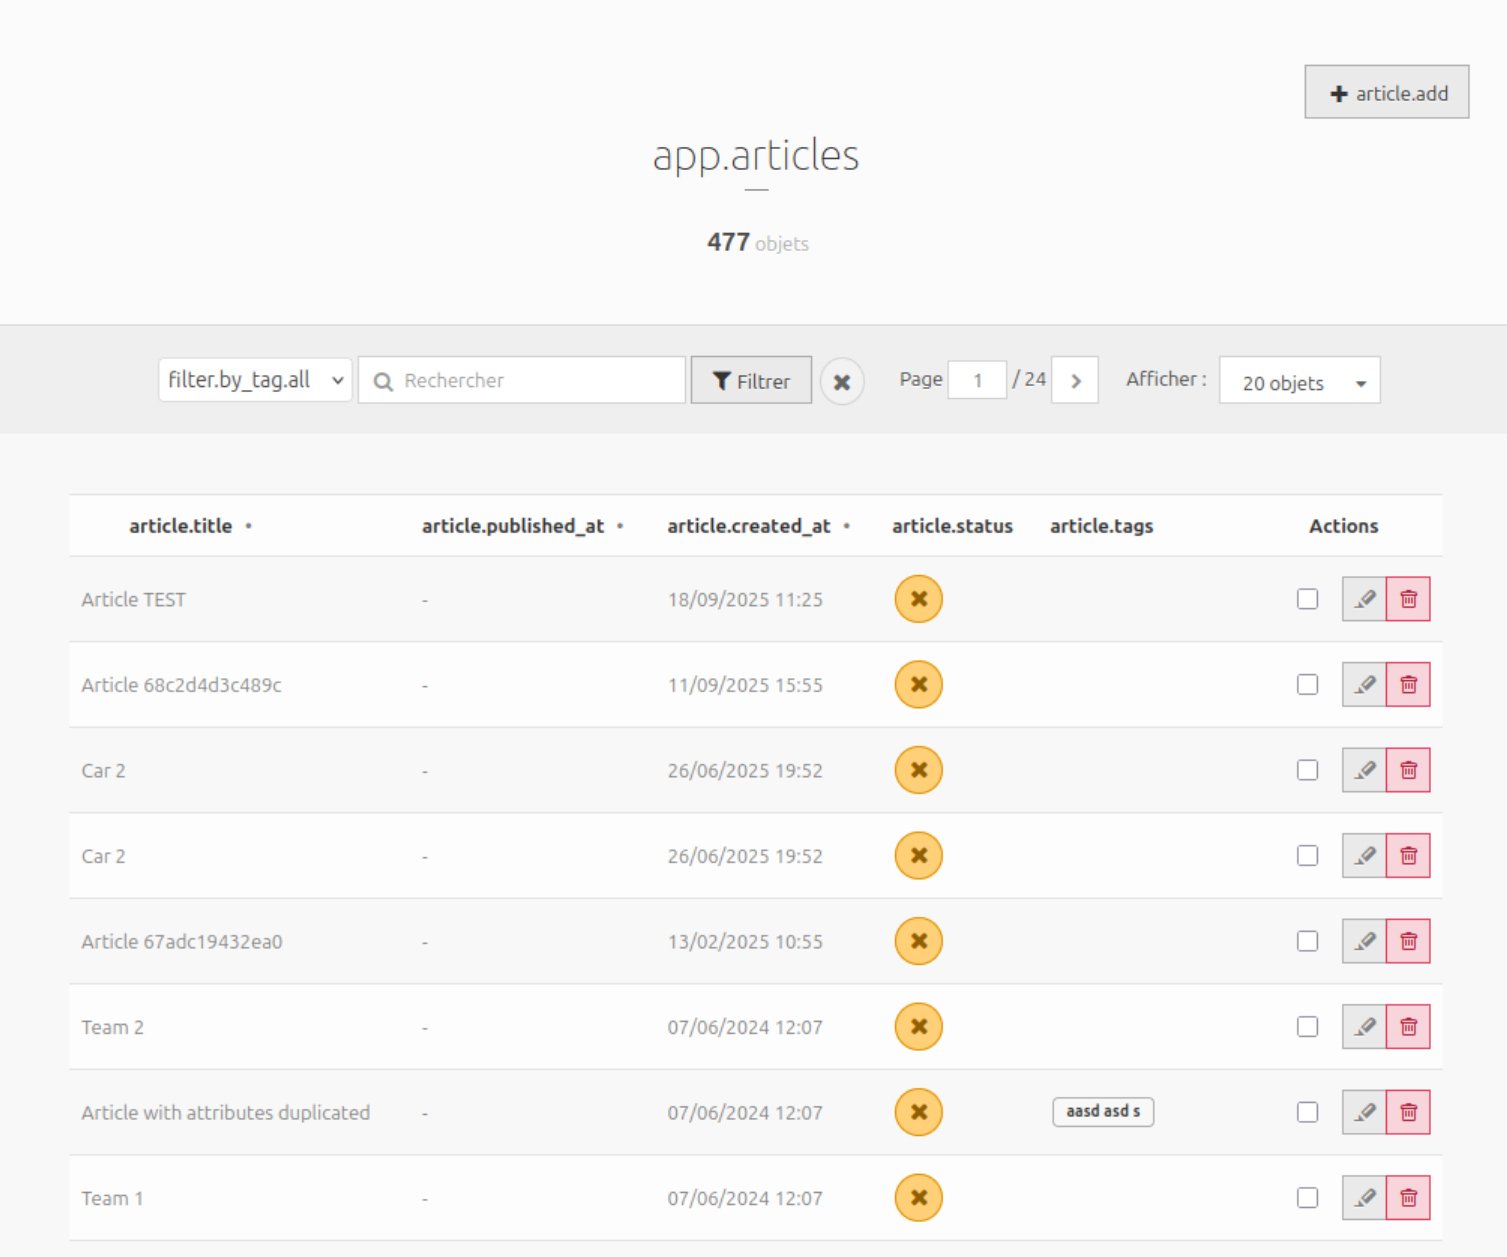
Test Your Backoffice Entry
Visit /rz-admin/articles in your back office to see the list of all NSArticle node sources and manage them using your custom forms and templates. Editing actions will redirect to the classic Roadiz edit node sources page.
Enable bulk actions (optional)
Add the following methods to your controller to enable bulk actions like publish, unpublish, and delete:
    protected function getBulkPublishRouteName(): ?string
    {
        return 'admin_article_bulk_publish';
    }

    protected function getBulkUnpublishRouteName(): ?string
    {
        return 'admin_article_bulk_unpublish';
    }

    protected function getBulkDeleteRouteName(): ?string
    {
        return 'admin_article_bulk_delete';
    }
Add corresponding routes in routes.yaml:
admin_article_bulk_delete:
    methods: [GET, POST]
    path:     /rz-admin/articles/bulk-delete
    defaults:
        _controller: App\Controller\Admin\ArticleController::bulkDeleteAction
admin_article_bulk_publish:
    methods: [GET, POST]
    path:     /rz-admin/articles/bulk-publish
    defaults:
        _controller: App\Controller\Admin\ArticleController::bulkPublishAction
admin_article_bulk_unpublish:
    methods: [GET, POST]
    path:     /rz-admin/articles/bulk-unpublish
    defaults:
        _controller: App\Controller\Admin\ArticleController::bulkUnpublishAction
TIP
bulkDeleteAction, bulkPublishAction and bulkUnpublishAction methods are already implemented in AbstractSingleNodeTypeController.
And create Twig templates for bulk actions in templates/admin/article/. You can copy and adapt them from https://github.com/roadiz/core-bundle-dev-app/tree/develop/templates/admin/article.
Override breadcrumbs generation for your shadow container (optional)
If you want to allow users to go back to your custom listing page from the edit node-source page, you can create a new BreadcrumbsItemFactoryInterface implementation.
Your service must be tagged with roadiz_rozier.breadcrumbs_item_factory and a higher priority than the default NodesSourcesBreadcrumbsItemFactory (priority 0).
<?php

declare(strict_types=1);

namespace App\Breadcrumbs;

use RZ\Roadiz\CoreBundle\Entity\NodesSources;
use RZ\Roadiz\RozierBundle\Breadcrumbs\BreadcrumbsItem;
use RZ\Roadiz\RozierBundle\Breadcrumbs\BreadcrumbsItemFactoryInterface;
use Symfony\Component\DependencyInjection\Attribute\AutoconfigureTag;
use Symfony\Component\Routing\Generator\UrlGeneratorInterface;

/**
 * Example of overriding node breadcrumbs item for a shadow container.
 *
 * @implements BreadcrumbsItemFactoryInterface<NodesSources>
 */
#[AutoconfigureTag('roadiz_rozier.breadcrumbs_item_factory', ['priority' => 10])]
final readonly class ArticlesContainerBreadcrumbsItemFactory implements BreadcrumbsItemFactoryInterface
{
    public function __construct(
        private UrlGeneratorInterface $urlGenerator,
    ) {
    }

    #[\Override]
    public function createBreadcrumbsItem(?object $item): ?BreadcrumbsItem
    {
        if (null === $item) {
            return null;
        }

        return new BreadcrumbsItem(
            $item->getTitle() ?? $item->getNode()->getNodeName(),
            $this->urlGenerator->generate(
                'appArticlesListPage'
            ),
            $item->getNode()->isHome(),
        );
    }

    #[\Override]
    public function support(?object $item): bool
    {
        return $item instanceof NodesSources && 'articles' === $item->getNode()->getNodeName();
    }
}